
Results 7,481 to 7,490 of 8077
-
 Verified Tsikot Member

- Join Date
- Sep 2015
- Posts
- 90
April 8th, 2018 01:30 AM #7481diko sure sir ang model ng bendix, pro sa suking auto supply lang siya galing,, bago magkabit ng bendix warp na talaga ang rotor ko, Originally Posted by benchph1

-
Tsikoteer
- Join Date
- Jun 2012
- Posts
- 4,447
April 8th, 2018 01:44 AM #7482Ok ba ang hi-q brake pads? Anyone tried it? Parang nabasa ko dito na korean oem sya. Nakita ko kanina sa mias. 1,418 at 1,169 price nya. Ok ba yun?
Sent from my HM 1S using Tapatalk
-
 Tsikoteer
- Join Date
- Nov 2007
- Posts
- 1,587
April 8th, 2018 02:36 AM #7483Yes, si japanabc nagsabi na oem supplier si hi-q from korea. Originally Posted by dct
Checked fb page ng GS owners and 950 lang pala front set.
Mura nga sya at oem pa compared to original na 2.5k. Bendix is 900-1k iirc.
May i know sino dealer ng hi-q sa mias?
Sent from my iPhone using TapatalkLast edited by JJB; April 8th, 2018 at 02:40 AM.
-
Tsikoteer
- Join Date
- Jun 2012
- Posts
- 4,447
April 8th, 2018 08:28 AM #7484Roadfit bro. Sa banawe. So medyo mas mahal pa pala sakanila. San po kaya yung 950? Originally Posted by JJB
Sent from my SM-A9000 using Tapatalk
-
Tsikoteer
- Join Date
- Nov 2007
- Posts
- 1,587
April 8th, 2018 07:34 PM #7485From the GS fb page: Andys parts depot Hi-Q brake pads Originally Posted by dct
For orders: 0917-5039909
Sent from my iPhone using Tapatalk
-
 Tsikot Member Rank 4
- Join Date
- Oct 2002
- Posts
- 2,639
May 1st, 2018 04:32 PM #7486Finally na-DIY install ko din yung Rear Power Socket para sa GS.
Tools and Materials needed:
1. Cigarette Lighter Socket with cover
2. Automotive Fuse Tap
3. Automotive Fuses (Mini type for the GS)
4. Automotive Wire (15meter, 16awg for the power line, 5meter, 18awg for the ground.
6. Wire connectors
7. 22mm hole saw for wood/plastic
8. Portable electric drill
9. Wire stripper
10. Wire crimper
11. Pry tools for sidings
12. Philips screwdriver
13. Cable ties
14. Eye connectors

The cigarette lighter sockets (also installed one below the shift lever because this is deleted on HARI Units) and fuse tap were ordered online. Sockets from Amazon, while the fuse tap came from Lazada.
Bought the wires from an Auto Supply. I already have spare fuses for my GS.
1. Layout the power line on the floor of the GS. You need to layout on the left side because thats were the fuse box is.
I had to take out the driver step board and left 2nd row step board to hide the wire there. Driver side is secured by two philips head screws and several clips. It needs manhandling to take out. Same with the one on the sliding door. Though there are no screws there. Secure the wire together with the factory harness using cable ties. For the last part, i just hid the wires below the rear sidings. Because its difficult to dismantle the rear sidings. I left about 1 meter allowance on both sides.
2. Connect the fuse tap on the front portion of the power line wire. No need to use wire connector here as there is a built-in connector on the fuse tap. Just secure it by using the wire crimper.
3. Dismantle the D pillar upper sidings, they are secured by very soft clips so take care. Next is to dismantle the lower portion of the rear sidings. There are two Philips screws and several clips securing this part. You might need to remove the weatherstrip to partly remove the lower sidings.
4. Choose a spot were you want to install the socket. I chose to dismantle the rear sidings first because i want to make sure theres enough allowance left against the frame. After you have chosen a spot, Use the 22mm hole saw and drill the hole. The end of the cigarette socket will fit inside the hole you just made, but you need to enlarge it by about half a mm more because of the plastic cover.
5. Snake the ground wire inside the rear sidings. The eye connector side near the rear washer tank, while the other side through the 22mm hole. This is also a good time to pull the power line through the 22mm hole.
6. Connect the power & ground wire to the cigarette lighter socket. Connect the Ground to the body/frame. I connected mine on an existing one.

7. Go back to the front part of the wire and open the fuse box. You need to choose a circuit that is suitable to tap power for your socket. For the GS, there is a 20A cigarette lighter circuit and a separate 15A power socket circuit. I chose to tap to the 15A power socket circuit. Take out the 15A fuse using the puller. Connect this to the fuse tap. Connect another 15A fuse to the fuse tap. Make sure the engine is not running or the key is not in ACC mode. Connect the fuse tap to the fuse box.

8. Go back to the rear part and check if there is power on the socket. If there is then success!
Of course you still need to reinstall the upper and lower part of the rear sidings, the weatherstrip, secure the rest wires using cable ties, the wire connected to the fuse box and finally, the socket. If it doesnt fit snugly on the hole you might need to enlarge it a bit more.
Finished product:


Sent from my iPhone using TapatalkLast edited by benchph1; May 1st, 2018 at 05:11 PM.
-
 Tsikot Member Rank 4
- Join Date
- Aug 2003
- Posts
- 1,299
-
Tsikoteer
- Join Date
- Nov 2007
- Posts
- 1,587
May 5th, 2018 10:08 PM #7488Damn, sounds not so easy to DIY. Im planning to do the same thing too, i have the fuse tap and usb plug already. Pagawa ko na lang sa labas[emoji51]
Thanks for sharing bro!
Sent from my iPhone using Tapatalk
-
Tsikot Member Rank 4
- Join Date
- Oct 2002
- Posts
- 2,639
May 6th, 2018 03:45 PM #7489Thanks Automahn.
Installment ang pagkabit ko dyan. Took me around 3-4 hours to do everything, but had to do in two separate occasions.
Mahirap na part yung pagtago ng wires sa ilalim, kasi kelangan baklasin pa yung driver & passenger side footwell.
Sunod na mahirap yung pagtantya ng laki ng butas para swak si power socket.
The rest is easy.
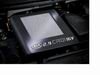
DIY for today. Inayos ko na din yung wiring ng second auxilliary socket. Dati kasi nakatap lang dun sa first socket.


FYI lang sa 3rd pic (encircled) Dyan ako una nag-tap para sa second power socket. Naka-direct pala sa battery yan kaya kahit naka-off ang ignition may power pa din. Had to choose a different circuit and change the orientation of the fuse taps para magkasya.
Sent from my iPhone using TapatalkLast edited by benchph1; May 6th, 2018 at 03:55 PM.
-
Verified Tsikot Member
- Join Date
- Apr 2018
- Posts
- 15
May 11th, 2018 02:54 AM #7490bossing kelangan pa po ba mag lagay ng fuse tap
balak ko rin kasi mag lagay ng extra cig lighter. eh ang plano ko sna eh i-tap ko nlng dun sa wire nung existing cig lighter.
balak ko po kasi 2 cig lighter na aditional.
possible po ba yun kung sa linya ng original cig lighter ako comonect?
tska san nyo po nabili yung cig lighter na kinabit nyo.
may nabili po ako kso malambot yung rubber cover nya cheap tignan. unlike nung sainyo mukhng oem tlga

 Reply With Quote


lotus elise all the way! 2004 edition
Lotus returns...