
too ricey...but hey, it's just me. =)
The Largest Car Forum in the Philippines
- Forums
- Discussions
- Events
- Community
Results 1,701 to 1,720 of 3706
-
 Tsikot Member Rank 3

- Join Date
- Sep 2005
- Posts
- 1,455
-
 Tsikoteer
- Join Date
- Oct 2007
- Posts
- 2,113
June 27th, 2011 02:09 PM #1702Muka pwede sa picanto ng mrs ko yan ah... liit kasi side view mirror ng pica konti lang daw nakikita nya lalo na pag nag park... kung pwede nga lang pang truck lagay ko para lahat kita nya, hehehe
-
Tsikoteer
- Join Date
- Mar 2004
- Posts
- 652
June 27th, 2011 05:42 PM #1703sir, kabitan mo ng side mirror ng tamaraw fx. Originally Posted by shadow3616931


-
Verified Tsikot Member
- Join Date
- Nov 2009
- Posts
- 18
June 28th, 2011 12:07 AM #1704hi po stock tire of avanza is 185/65/r15, okay lang po ba kung 175/65/r15 ang ipalit namin.. thanks in advance...
-
 COO - Child of Owner
- Join Date
- Sep 2005
- Posts
- 15,310
June 28th, 2011 09:45 AM #1705sir makitid na nga yung 185.. papalitan mo pa nang mas makitid... i suggest 195/60/15 ipalit nyo sir..
Originally Posted by zj09
-
 AvanzaClubPilipinas
- Join Date
- Jan 2005
- Posts
- 1,994
-
Verified Tsikot Member
- Join Date
- Feb 2010
- Posts
- 85
June 29th, 2011 01:20 PM #1707mga bosing nagpalit na din po ako ng rim 14 na din kasi sayang naman yun gulong ko.. wolf ang tatak..
-
Tsikot Member Rank 3
- Join Date
- Sep 2005
- Posts
- 1,455
June 29th, 2011 05:12 PM #1708ni-google ko sya, pang-ATV mostly yung tires na nakita ko. kamusta naman ang performance sir? =) Originally Posted by sniper21
-
 Tsikoteer
- Join Date
- Jul 2008
- Posts
- 1,452
June 29th, 2011 08:32 PM #1709Saan gawa yan at magkano ang per piece... Originally Posted by sniper21
-
 Tsikoteer
- Join Date
- Dec 2007
- Posts
- 3,938
June 30th, 2011 09:35 AM #1710Parang ganito ba, sir? Originally Posted by flying_fox
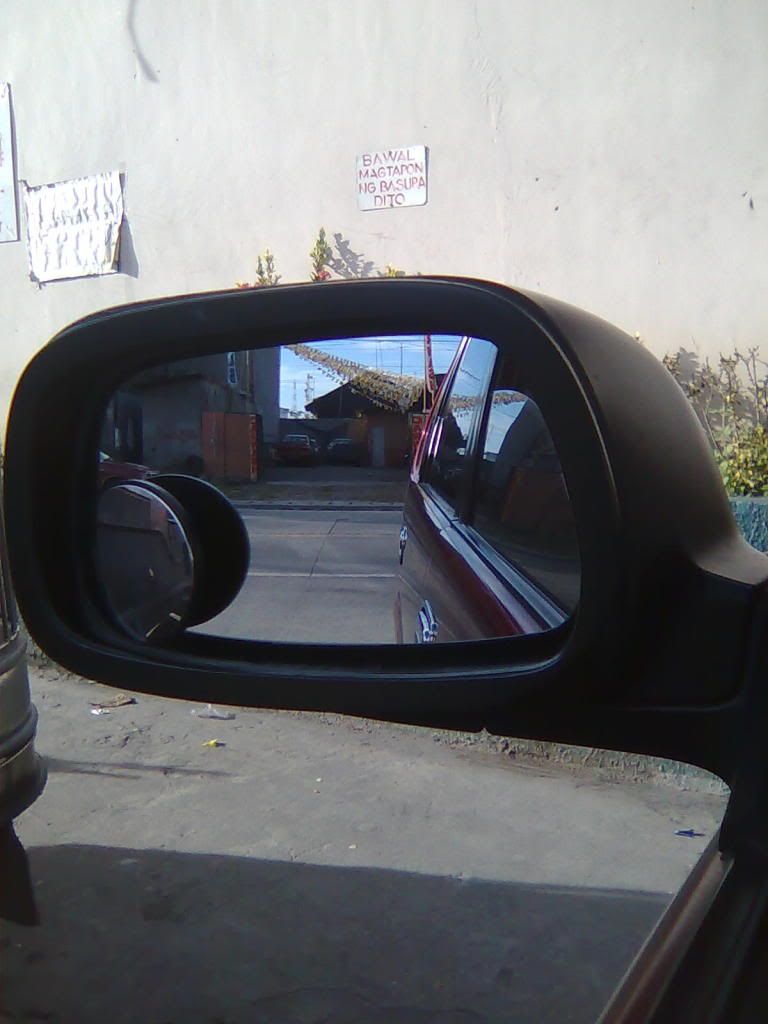
Hindi na ako nag-a-adjust pa. Iyung sa kanan, flat model lang, hindi ganyan ka-wide ang coverage pero di rin ako nag-a-adjust pag nagpa-park. Sanayan lang siguro.
Medyo nasasagwaan ako dun sa fender-mounted mirror (yung sa SUV). Iyung nakapatong naman parang tinubuan ng kulugo.
Iyung sa atin, sir, 'ika nga ni Vice Ganda, e, "tama lang." Hehehe.
Pero opinion ko lang naman po ito.
[SIZE=1]1,710/3,931[/SIZE]
-
AvanzaClubPilipinas
- Join Date
- Jan 2005
- Posts
- 1,994
June 30th, 2011 12:02 PM #1711mas trip ko mga backing camera nalang gamitin, one for left and one for right side, may mga murang backing camera with small lcd

-
Tsikot Member
- Join Date
- Jul 2011
- Posts
- 1
July 1st, 2011 02:52 PM #1712excuse me, i found Innova owner manual from this forum
but i cannot found the owner manual for Avanza
i don't know if it ever has uploaded
can someone give me the link to get it?
many appreciates for helping
sorry for my terrible english
-
 Tsikoteer
- Join Date
- Apr 2010
- Posts
- 1,118
July 2nd, 2011 10:09 AM #1713sir 9th i guess have posted it as a scanned copy. Originally Posted by hans23
however, i do not know if he has completed scanning the whole manual yet...
-
Verified Tsikot Member
- Join Date
- Feb 2010
- Posts
- 85
July 2nd, 2011 12:08 PM #1714sa Tire Depot ko nabili sa SM Php15k+ po.. ok naman po ang performance.. Originally Posted by flying_fox
-
 Verified Tsikot Member
- Join Date
- May 2010
- Posts
- 146
July 2nd, 2011 07:30 PM #1715pics sir? Originally Posted by sniper21
meron tire depot dito sa tabi ace sa sm fairview.
magaganda ang rims duon.
-
Verified Tsikot Member
- Join Date
- Feb 2010
- Posts
- 85
July 2nd, 2011 08:46 PM #1716sige po. try ko maya upload pag na pics ko na.. Originally Posted by cjsdaddy
-
Tsikoteer
- Join Date
- Jul 2008
- Posts
- 1,452
July 2nd, 2011 11:39 PM #1717Thank you sa reply...if ok naman ang performance good choice yan... Originally Posted by sniper21
-
Tsikoteer
- Join Date
- Apr 2010
- Posts
- 1,118
July 5th, 2011 12:16 AM #1718Avanza DIY: Bumper Cover LED Foglamps


since i had these bumper covers on Blackie Dos, already entertained the possibility of another set of foglamps.. bought these bumper covers w/ the matching foglamp covers from sir marfin several months back.. now, time for DIY..
kahit for the past 2 days e toxic ang duty dito sa hospital. finally started out my DIY..
here is what i started out so far..

repainted them again w/ flat black acrylic paint (iwas gloss, regain back original color and texture); again dahil napinturahan ko ito ng chrome paint before. kaya lang diko nagustuhan ang labas, more of silver at hindi chrome.

prior to painting, nagawa ko na pala butasan yung center area gamit yung same drill bit na pinambutas sa rear bumper for the parking sensor.

pinagdikitan ng yellow reflective sticker, using mild soapwater solution technique (provided more chances of readjusting the sticker to desire position). original plan initially: chrome sticker sana courtesy of TBR Concepts dito sa Davao, kaya lang erratic kasi visits to Davao, kaya settled for yellow reflective sticker instead. and since yellow, i think na baka mas makaprovide ito ng ample lights especially pag ulan than white light.
-
Tsikoteer
- Join Date
- Apr 2010
- Posts
- 1,118
July 5th, 2011 12:19 AM #1719
itong leds for fogz na nabili from Norman, would then go to the holes provided..
 Click this bar to view the original image of 800x600px.
et nga pala yung reflection ng stickers sa flash ng phonecam.. parang okay naman yung nirereflect na ilaw diba? ano na kaya pag LED na ang nandyan?
putting this on hold, 'cause next steps would need some other people/parts...
1. had to have a precut, transparent plastic to cover up this middle area. kukuha ako dun sa gumagawa ng plastic signs.
2. to partially affix the transparent plastic w/ cyano-acrylic glue, then seal the edges with silicon sealant.
3. to affix the foglamp to a 2-switch circuit sa sasakyan; 1st pushbutton switch to turn on the lamps and 2nd, dimmer switch to control the light intensity of LED's.. the only missing part so far: dimmer switch.
-
Tsikoteer
- Join Date
- Apr 2010
- Posts
- 1,118
July 5th, 2011 06:02 AM #1720good news! nakakita narin ako seller ng dimmer switch. it is a used gauge dimmer switch, also oem tyt.. and i get to choose from 2 types:

rotary... (mas mura pero mahirap magbutas ng exact fit na bilog)

or itong roll-up/down switch.. (mas mahal)... i think i will choose this one. kasi di gaano malaki yung part ng switch na itatago sa panels, at mas madali siguro mag-cut-out ng rectangles sa panel. sana nga't makahanap rin ako nitong door lock switch para naman sa door lock DIY..

 Reply With Quote