
Guys, nagawa na rin namin ang A/C switch ng Avanza ko. Woohoo!!!
Heto, gumawa na lang ako ng separate DIY thread...
Kumpletuhin ko na, from start to finish.
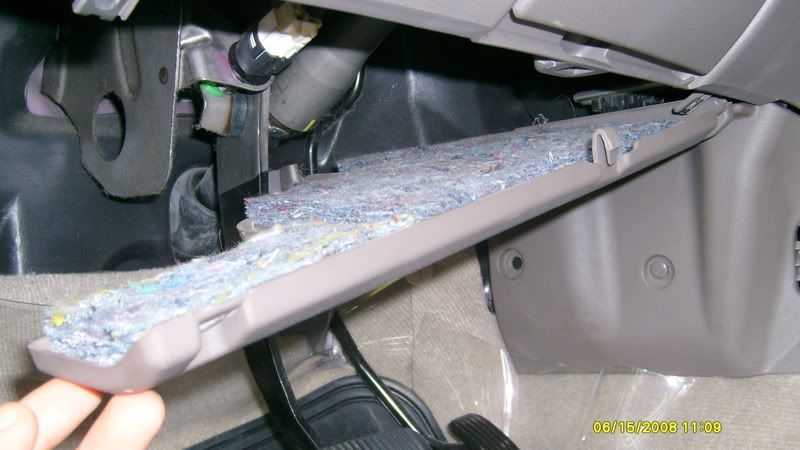
1. Open the bottom cover of the console, below the steering wheel:
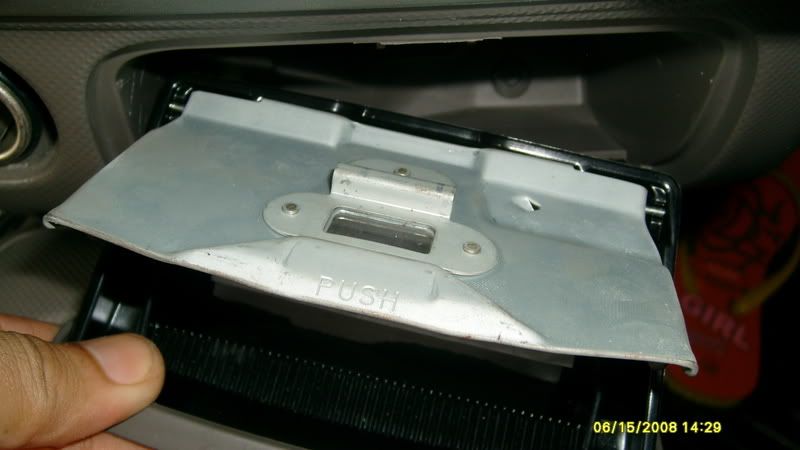
2. Open the center panel.
a. Remove Ash Tray:
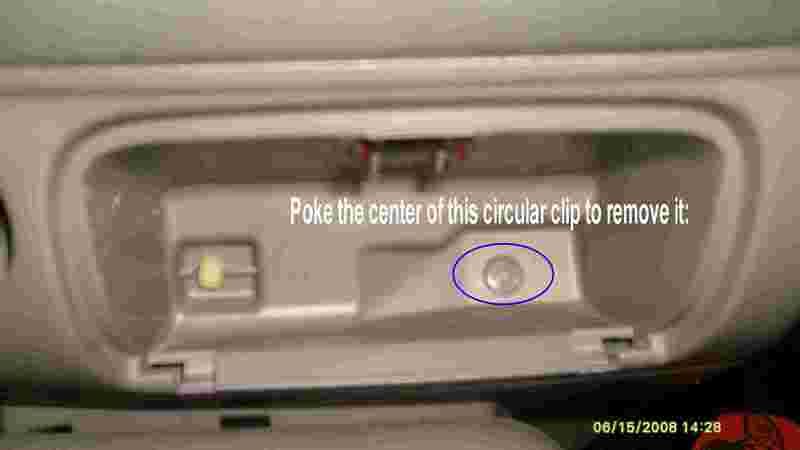
b. Poke the center of that circular clip (right side) behind
the ash tray well:
c. Pull out the center panel, starting from the BOTTOM (easier
approach, compared to the one from myavanza.net). Sorry, wala akong
picture, pero mas madali talaga kung uunahing tanggalin mula sa ibaba.
Promise!
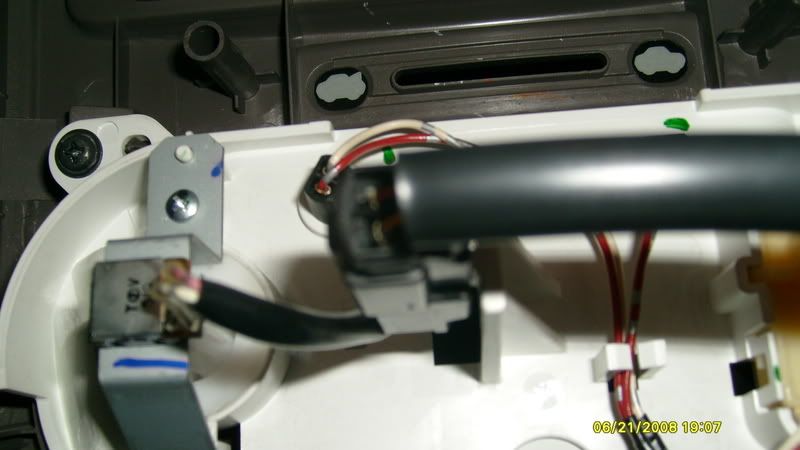
d. Tanggal na ang center panel:
e. Mouse's eye view of the relevant portion of our project
(close-up of thermostat's back):
To be continued...
The Largest Car Forum in the Philippines
- Forums
- Discussions
- Events
- Community
Results 1 to 20 of 34
-

 Tsikoteer

- Join Date
- Dec 2007
- Posts
- 3,938
June 24th, 2008 08:33 AM #1
-
Tsikoteer
- Join Date
- Dec 2007
- Posts
- 3,938
June 24th, 2008 09:31 AM #2... continued... part 2:
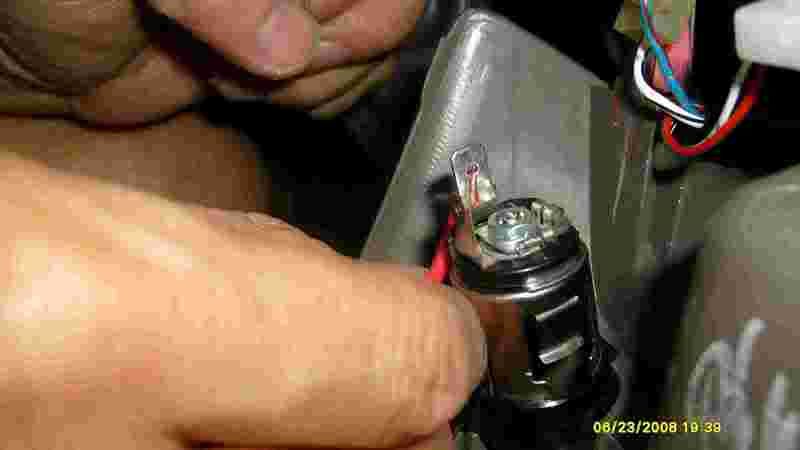
3. Reach up through the removed bottom cover so you can pull out the DEFOGGER SWITCH, by pressing both sides inwards to retract the locking clips:
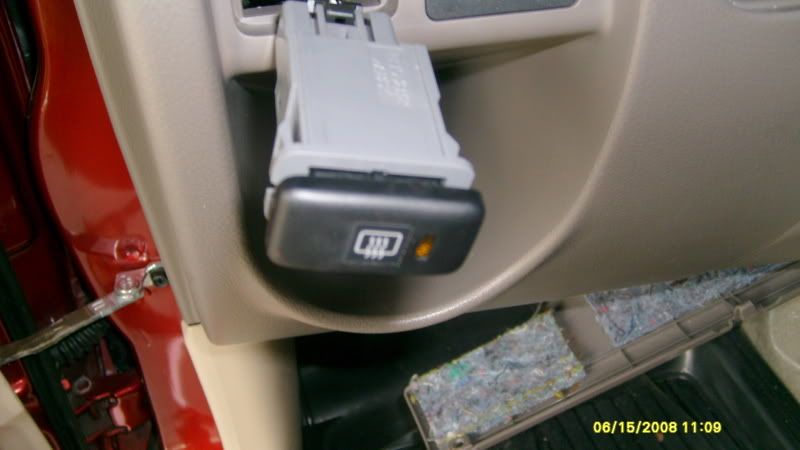
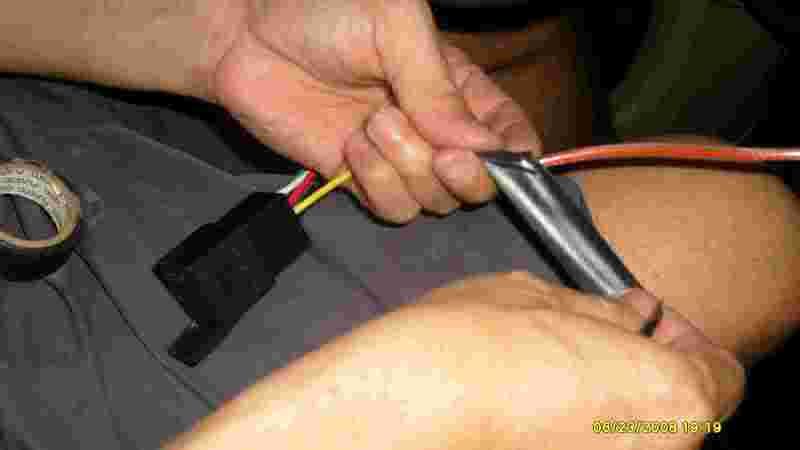
4. Remove the Defogger switch so you can tap onto the middle of the big wires:
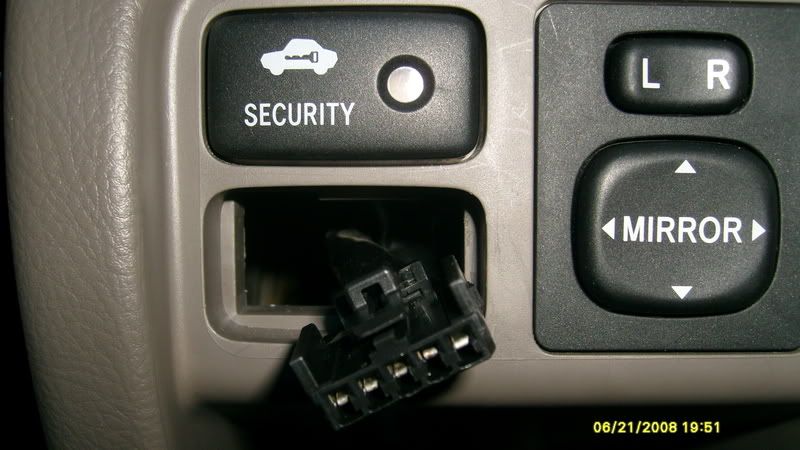
5. Isolate the 4th wire (middle of the 3 big wires) and expose a small portion...
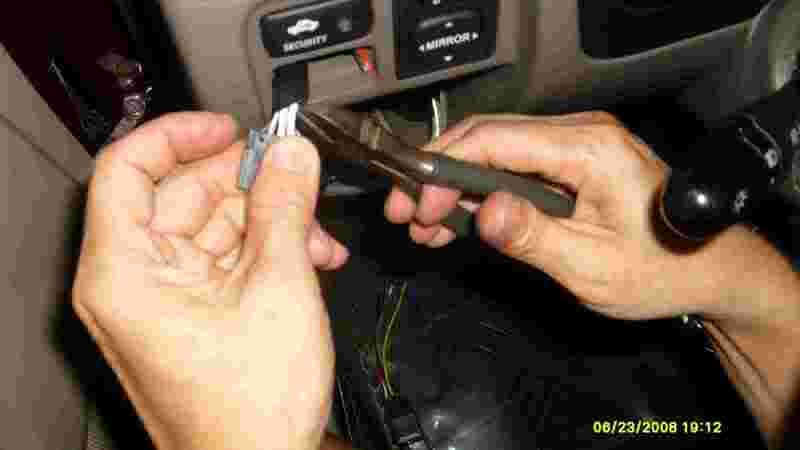
6. ... so you can tap the new single wire (medyo napalaki ang wire na nabili ko, hehe):
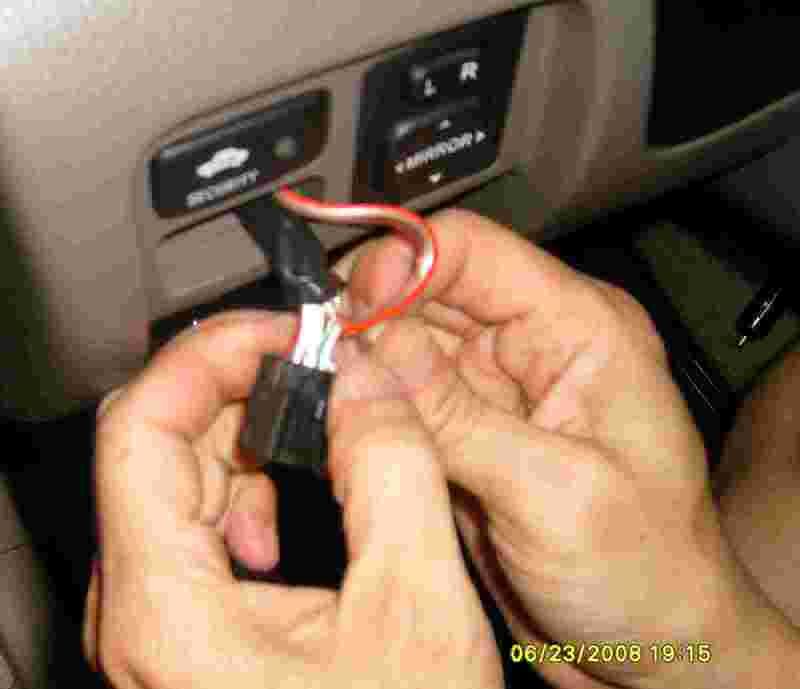
7. ... the other end of which should go out the center panel near the lighter socket. This other end will connect to the the #86 terminal on the Bosch relay:
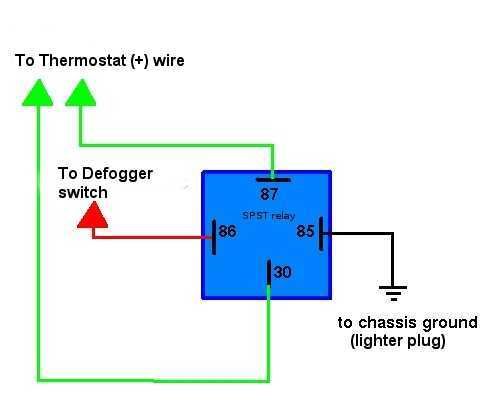
End of part 2...
To be continued...Last edited by woohoo; June 24th, 2008 at 09:43 AM.
-
 Tsikot Member Rank 5
- Join Date
- Aug 2005
- Posts
- 7,186
-
Tsikoteer
- Join Date
- Dec 2007
- Posts
- 3,938
June 24th, 2008 10:09 AM #4... continuation... Part 3:
8. Secure the connection to #86 terminal with electrical tape:
9. Don't forget to DETACH the defogger from the system:
10. Test the connection if it's working by touching the #85 terminal wire to the chassis ground (lighter plug's side) and switching the Defogger ON.
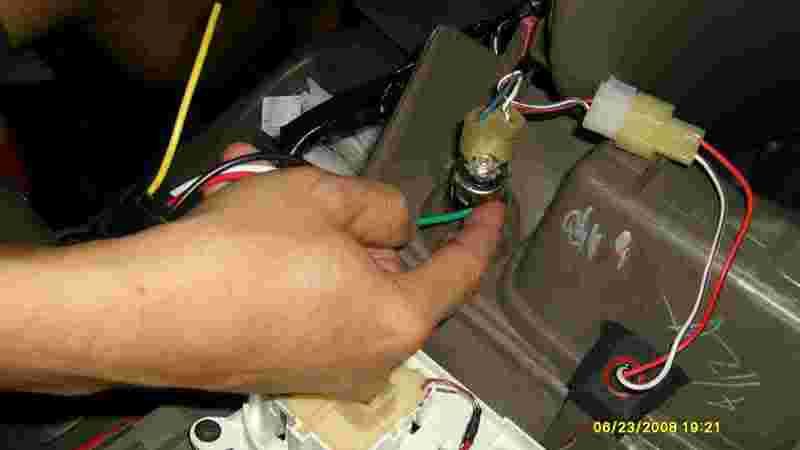
11. Pull aside the positive wire's insulation (clear plastic) to prepare for desoldering it away from the thermostat:
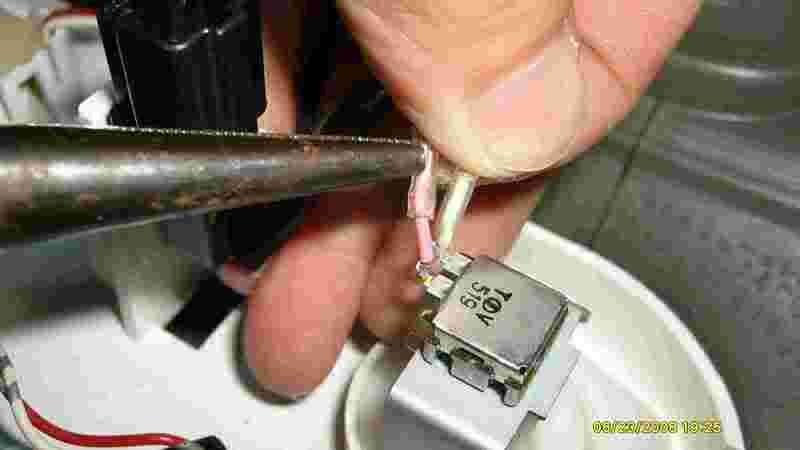
12. Solder it off:

... end of part 3...
To be continued...
-
Tsikoteer
- Join Date
- Dec 2007
- Posts
- 3,938
June 24th, 2008 10:19 AM #5... continued...
Part 4:
13. Solder the relay's wire (#30 terminal) onto the thermostat where you desoldered the other wire from:
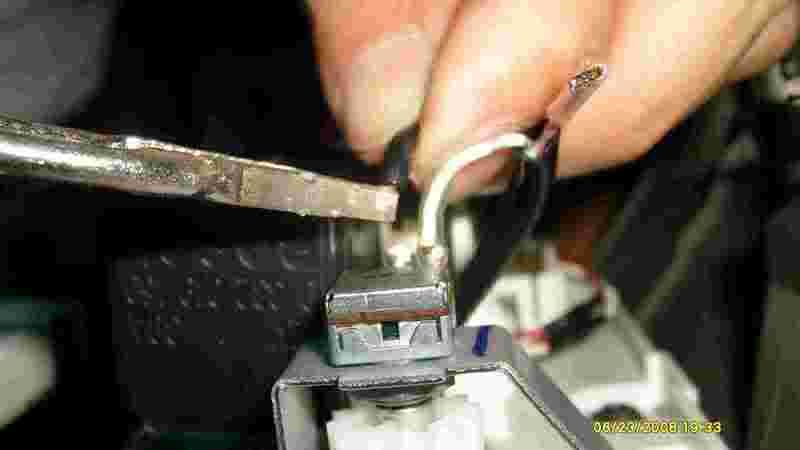
14. Solder the detached wire to the relay's #87 terminal and mount the relay onto the top screw of the thermostat dial:
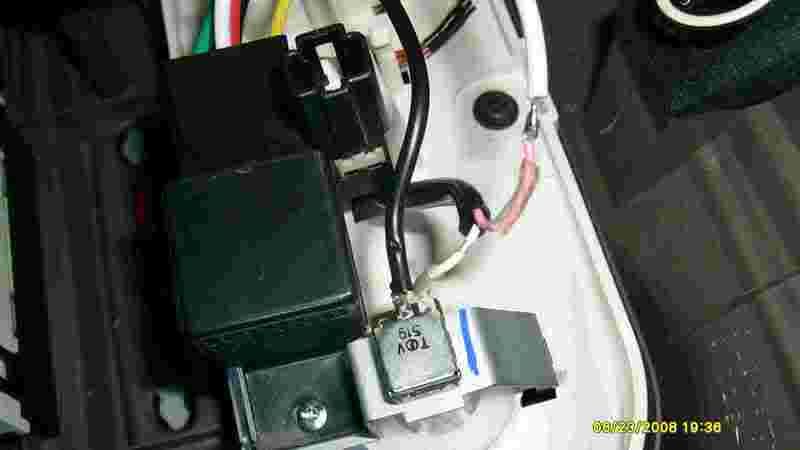
15. ... and secure it with electrical tape:
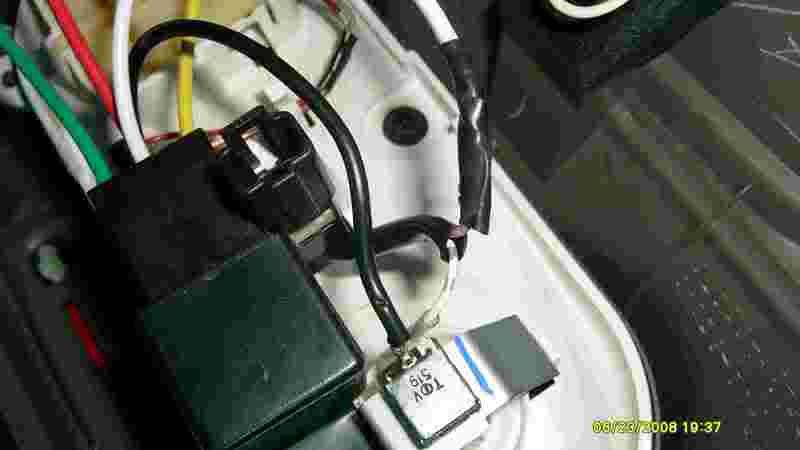
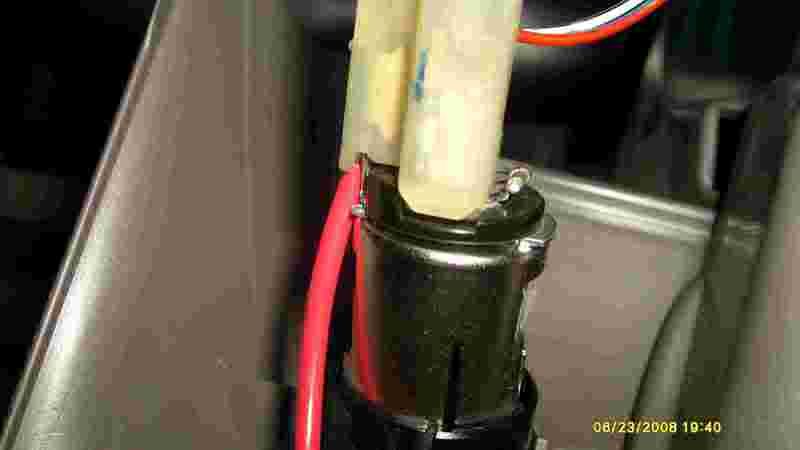
16. Insert the #85 wire into the ground plug terminal of the lighter socket:
17. Insert back the lighter socket's modular plug to secure the connection:
... end of part 4....
To be continued...
-
Tsikoteer
- Join Date
- Dec 2007
- Posts
- 3,938
June 24th, 2008 10:26 AM #6Plug back everything, restore the center panel, and the defogger switch. All done! It's working!!! Woohoo!!!
I hope this helps others who are interested in installing an A/C switch in their Avanza (or even other cars, for that matter!).
I did this because I have no need for the defogger, and the Avanza has no A/C switch. I don't want to wear out the thermostat dial by turning it this clockwise and counter-clockwise at least 4 times everyday just to be able to MAX OUT THE FANs with the compressor OFF (to blow away moisture from the system, which has been recommended so as to prevent molds from growing in there).
-
 Tsikoteer
- Join Date
- May 2004
- Posts
- 5,965
June 24th, 2008 11:08 AM #7for clean install..pero sayang yung defoger sa likod...oh well, may rear wiper naman,e....
siguro others could use another defogger switch for a dedicated switch at install sa may katabi ng hazzard..
nice input, detailed...
-
 Tsikot Member Rank 2
- Join Date
- Aug 2006
- Posts
- 2,320
June 24th, 2008 11:18 AM #8Does it mean that Avanza don't have on/off switch at the Fan Selector switch?
-
 Tsikot Member Rank 2
- Join Date
- Jan 2008
- Posts
- 431
June 24th, 2008 11:21 AM #9*woohoo...Congratulations on your latest project!
Another usefull and informative contribution. Keep them coming!
-
Tsikoteer
- Join Date
- Dec 2007
- Posts
- 3,938
June 24th, 2008 11:50 AM #10It does. If you don't turn the FAN on, the compressor will not work. To simplify, let's ignore the vents at the 2nd row. There are 2 dials, one for the Fan, one for the temperature (thermostat). The thermostat will not work if the FAN is off. The compressor will not work if the thermostat is at the OFF position. Originally Posted by Mile2

Since I want to follow the recommended way of avoiding molds in the ducts, I want to turn off the compressor while the FAN is at MAX power before and after cooling the cabin. But I want to avoid unnecessary wear and tear on the thermostat dial, so I installed this A/C switch.
-
 Don't feed the Troll
- Join Date
- Nov 2006
- Posts
- 832
June 24th, 2008 11:52 AM #11Does the defogger have any indicator on the dashboard panel? It might confuse the driver for that matter.
-
Tsikoteer
- Join Date
- Dec 2007
- Posts
- 3,938
June 24th, 2008 11:55 AM #12Thanks po... Originally Posted by alwayz_yummy
Actually, ganyan talaga ang balak ko. Install a separate SWITCH, retain the old one, (kahit naka-paloob lang sa ilalim ng dashboard). Kaso, ang hiiiiiiiirap mag-acquire ng switch!
Pero doon ko pa rin ikakabit, kasi, balak ko ring mag-install ng central door lock switch dun sa location na sinasabi mo. Para hindi na kailangan mag-reach out ni misis para i-lock ang sasakyan kung bababa ako sandali.
-
Tsikoteer
- Join Date
- Dec 2007
- Posts
- 3,938
June 24th, 2008 11:55 AM #13Thanks po... Originally Posted by alwayz_yummy
Actually, ganyan talaga ang balak ko. Install a separate SWITCH, retain the old one, (kahit naka-paloob lang sa ilalim ng dashboard). Kaso, ang hiiiiiiiirap mag-acquire ng switch!
Pero doon ko pa rin ikakabit, kasi, balak ko ring mag-install ng central door lock switch dun sa location na sinasabi mo. Para hindi na kailangan mag-reach out ni misis para i-lock ang sasakyan kung bababa ako sandali.
-
Tsikoteer
- Join Date
- Dec 2007
- Posts
- 3,938
June 24th, 2008 12:14 PM #14Not a big deal naman po in my case... Originally Posted by Taurus
It will confuse the driver ONLY IF I don't tell him/her about the switch. Which most probably means s/he is a carnapper ... (Knock on wood)
I don't lend my rides naman basta-basta, eh. My Avanza is exclusively used by yours truly 99.9% of the time. My wife doesn't drive (yet). My best friend owns the hands that you see in the pics, and he's the next person who can drive this with my permission. Next in line will be my brothers, but they have brand new rides, too, so they don't have to borrow my Avanza. No one else is allowed to drive it.
-
Tsikoteer
- Join Date
- Dec 2007
- Posts
- 3,938
June 24th, 2008 12:17 PM #15Salamat... Originally Posted by Eypeeyu
Will do! I hope makapag-install ako ng central door lock, soon.
-
 Tsikoteer
- Join Date
- Oct 2007
- Posts
- 2,113
June 24th, 2008 12:19 PM #16Your right, ganon ang plano ko, deffoger or fog lamp switch, unfortunately 2500 ang cost ng switch na yan, sa casa lang nabibili, and wala din kasukat na surplus switch, for the mean time ordinary switch lang linagay ko... Originally Posted by alwayz_yummy
Meron, pero iba pa AC switch yun yung puede mo patayin yung compressor lang while fan is on. Puede rin sa thermostat pero baka masira kakapihit Originally Posted by Mile2
*woohoo; gumamit ka pa palang relay, di na kailangan yan kasi low current lang (mA) yan. Gumagamit lang relay pag high current 5 amps and above. Pero maganda pagkagawa nung sayo kasi nag soldering ka pa bat di ko naisip yun....
-
Tsikoteer
- Join Date
- Dec 2007
- Posts
- 3,938
June 24th, 2008 12:32 PM #17Na-measure ko kasi yung input voltage nung thermostat, +5V lang siya. So hindi pwedeng umilaw yung indicator light ng defogger switch (+12V). Saka mas convenient sa troubleshooting, tanggalin lang yung relay plug sa relay switch, ayos na. Originally Posted by shadow3616931
So nag-tap ka sa medyo hidden na portion ng wires? Tama ba?Pero maganda pagkagawa nung sayo kasi nag soldering ka pa bat di ko naisip yun....
-
Tsikoteer
- Join Date
- Oct 2007
- Posts
- 2,113
June 24th, 2008 04:14 PM #18No not tap...CUT then series. Bat di ko naiisip yung i-solder nalang eh kumpleto ako ng pang electronic yung nga lang matagal ko na di nagagamit. Originally Posted by woohoo
-
Tsikoteer
- Join Date
- Dec 2007
- Posts
- 3,938
June 25th, 2008 09:39 AM #19Right... that's what I meant, actually... Wrong term nga pala ang TAP. Originally Posted by shadow3616931
-
Tsikoteer
- Join Date
- Dec 2007
- Posts
- 3,938
June 25th, 2008 11:40 AM #20Naalala ko lang... umaandar pa rin naman ang defogger sa likod... I just have to restore the plugs back onto the 2 terminals... Once in a blue moon lang siguro, if ever... Originally Posted by alwayz_yummy


 Reply With Quote