
Results 61 to 70 of 108
-

 Tsikoteer

- Join Date
- Jan 2003
- Posts
- 1,973
-
Tsikot Member Rank 4
- Join Date
- Jan 2003
- Posts
- 2,979
-
 Tsikoteer
- Join Date
- Oct 2002
- Posts
- 29,354
February 26th, 2009 04:46 PM #63Honestly, LCD and DLP projectors have come down in prices which generally start at P30,000 for entry level digital projectors with a native resolution of between 800x600 and 1000x800 and 2000 lumens brightness rating. And these would have features like keystone correction, remote control, etc. aside from being small and compact enough to bring on a trip.
And if you are even more of scrooge, you can try CDR-King's digital LCD projector which is priced at around P16K if I remember correctly.
-
Verified Tsikot Member
- Join Date
- Sep 2008
- Posts
- 55
February 27th, 2009 03:23 PM #64This is an opto-electronic project.
A "Do it yourself project"
This project will not interest you or will never get apprecated if you are not a do it yourself guy.
Probably almost all people, in one time or another, has been able to build something for their home or for themselves. No matter how inferior it could be, you are going to be proud of it because you did it yourself.
I hope somebody out there will give a recommendation on improving this project rather we get involve in a never ending debate on whether this project is worthwhile to do or not. For so many years, It has been debated in so many site worldwide . For me its painful and its very tiring to even think about it. A guy from this site has already visited my project and he was very pleased and the project was well appreciated and I am happy to share my project with him. I found a new acquaintance in the D'banker. He is a professional and a very nice fellow.
A guy named Philip and his wife visited me yesterday and they like what they saw. He works at Quiapo Church. They are using using 2 projectors at Quiapo Church and both are busted after less than 2 years. Repair and bulb replacement cost is very high according to him. We are going to work together now to try this diyprojector at the church. If this thing work in a big venue, then the Church may not spend in buying projectors again as this projector is repairable, customizable, upgradable parts are easily available, bulb is very very cheap and the technical support , i can very well take care of it.
We are not looking at a fantastically bright projector for the Church. The objective is the projected text image is easily readable and understable and the projector will last much longer than the commercial projector.
Hopefully in this site, some guys with technical know how in opto electronic display might be able to give some recommendation.
-
Verified Tsikot Member
- Join Date
- Sep 2008
- Posts
- 55
February 28th, 2009 09:54 PM #65I am 95% finish with 7 inch projector.
But because of a new development. This will now be use at Quiapo Church that will project 141 inches digonal at at distance of 207 inches from the screen.
I will need to revise the box again as I will have to use a smaller focal length projection lens from 345mm to 265 mm
the agreement is not to install a fantastically bright projector but one that can easily be read and easily understood during the service even in broad daylight. Its must be able to last longer than commercial.
Hopefully, Flips and I can install it next week.

-
BANNED BANNED BANNED
- Join Date
- Nov 2008
- Posts
- 416
March 1st, 2009 02:04 AM #66am pretty sure this will work kasi it will be used to glorify Him... diretso na kay Lord yan!!! Mabuhay kayo!!! Originally Posted by hertzblaster1


-
Tsikot Member
- Join Date
- Apr 2009
- Posts
- 1
April 14th, 2009 01:03 AM #67good evening Im a new member I'm very interested with your lcd projector> First of all You really done a good job their. gusto ko sana makita yang lcd projector mo talagang gagawa ako or baka magpagawa ako sayo.
-
Verified Tsikot Member
- Join Date
- Sep 2008
- Posts
- 55
April 14th, 2009 09:53 PM #68Yes you can see it. i live near SM San Lazaro and UST. But I cannot build for you as this is a diy project.
Here is the summary for building a projector.
Step by Step guide in buidling your own cheap lcd projector-For movies,gaming,karaoke and outdoor use
Materials Needed.
A> Lenses
1. Projection lens- Magnifies the image of the lcd
2. Fresnel lens
a. Field fresnel - Converged the lighted image of the lcd to the projection lens
b. Collimator fresnel- Focuses on the lamp. Collects the light from the lamp and transmit parallel light rays to the lcd.
3.Front surface mirror-optional
4. 12v dc power supply for fans and lcd-use pc power supply
B>Light Engine
1. Metal halide bulb- 150w -250w: high lumens/ color temperature bulb
2. Ballast- Controls the power delivered to the lamp
3. Capacitor- Power factor corrector. power saver
4. Ignitor- Start up the lamp creating 3.4kv sparks to fire the chemical inside the lamp
5. Reflector- Recovers wasted light from the lamp
6. Condenser lens - Increase light collecting efficiency and divert more light to collimator fresnel
7. IR/UV filter- reduce temperature of lcd created by heat /infrared radiation generated by the lamp. Reduce UV rays to prevent discoloration of lcd.
Others
1. Front surface mirror- bend the light to make the box smaller
2. 2-units blower fans - cool down all the parts inside the projector
3. Fan grill- use for mounting parts of the light engine
4. bolts and nuts of diff sizes
Step 1- Choosing your lcd.
Consideration choosing the right LCD for your need.
A> LCD size
DIY projector normally is bigger , or alot of times, alot bigger than commercial projector. Size normally is the first issue.
1. If size is not an issue, then there are alot of cheap used LCD out there with digonal size of 15 inches with xga resolution, very good enough to project high definition images.
2. If size is a problem, then its gonna take alot of effort to get compatible LCD. But if you have the money to spend, you can easily buy on line. Smaller LCD like 8.4 inch diagonal normally has SVGA resolution, few are xga resolution which are very expensive say around $250 on line.
B> LCD resolution
1. XGA Resolution (1024x768 pixel) A bigger LCD say 15 inches and above has xga resoluiton which are capable enough to display high definition images. Smaller LCD with XGA resolution are expensive.
2. SVGA resolution (800x600 pixels) - DVD disk has a resolution of 720x480 pixels so if you have an lcd with svga resolution, it can display the full resolution of dvd players which can display very good images (xga of course is alot better)
3. VGA resolution (640x480) - If you are really low on budget, some small lcd has vga resolution. this can still project good images though your projected image size will be limited otherwise you will see screendoor effect(pixelated) and washout images.
It is not recommended anymore to use lcd with resolution lower than vga resolution.
C> LCD inputs
1. VGA input - Never buy the lcd without vga input (computer video cable) . VGA input can display progressive output from your sources like pc and component output ( need transcoder to convert to vga) of dvd player .
2. HDMI/DVI (digital input) - Some lcd models have DVI input which is very good because some dvd players have dvi output. Very few lcd have HDMI input. DVI/HDMI peforms better than vga interface because it will bypass the A/D converter from dvd players, pc, and lcd monitor. The lesser electronics used, the better is the image quality.
Composite input/ s-video of dvd players only displays 720x240 pixels so avoid using this as much as possible. Remember VGA interface is the minimum requirements.
D> LCD aspect ratio
1. 4:3 aspect ratio- It has the same aspect ratio of regular TV. In the old days, most of the movies are 4:3 so no problem in displaying the correct image size. But nowadays, most movies are widescreen (1.77:1)or letterbox format ( 2.35:1). So you will see black bars in top and bottom of your image. You will lose up to 60% of lcd resolution when you use widescreen and letterbox movies so image quality will go down.
2. 16:9 aspect ratio- When you play 4:3 aspect ratio movie, you will see black bars at the two sides. But nowadays, widescreen are prevalent and you will use full resolution of your lcd and image quality will be better than when using 4:3 aspect ratio lcd.
E> Contrast Ratio - This is other lcd specification that can make lcd cheap or expensive ( the other one is resolution). Higher contrast say more than 1000 can produce beautiful images than with lcd with lower resoltuion. Contrast is the difference in intensity of white and black.
F> Response time- Lower lcd response time means lcd can display moving images smoothly. try to get lcd with response time not higher than 25ms . The lower, the better
G> Number of colors- Look for lcd with 16.7million colors to give accurate color rendition. colors with 200k is also good but will not be displaying the real color.
E> Compatibility- After learning all of the above, you must be sure that lcd is compatible. Compatibkle lcd has only one circuit board attached to the lcd panel.
Step 2- LCd strippinng and mounting the lcd in the panel
Strippping of lcd differs from on another. Each lcd is unique in construction. Others are very easy to strip and others will give you hard time. To be sure, just follow the lead of other builders.
Mounting the lcd in the frame: Before stripping the lcd monitor, make sure the frame is ready. You need to know the effective display area of the lcd so that you can make the frame. Use 1/4 to 1/2 marine or ordinary plywood for the frame. Aluminum and steel plate is also very good.
"Mounting of the lcd in the frame is the most critical part of the project". Make sure that the lcd is fully secured and hanging wires should be clamp to the back board. Lcd is the most expensive part of the project so dont take a shortcut. This is a very strong warning to all builders. The flat ( orange cable) ribbon cable connecting the lcd to the A/D board is very fragile. If you break this, then your lcd is dead. totally.
Be accurate in making the frame. The frame open area should be about 0.5mm bigger than the lcd effective display area in all sides. Again be accurate or you will regret this later.
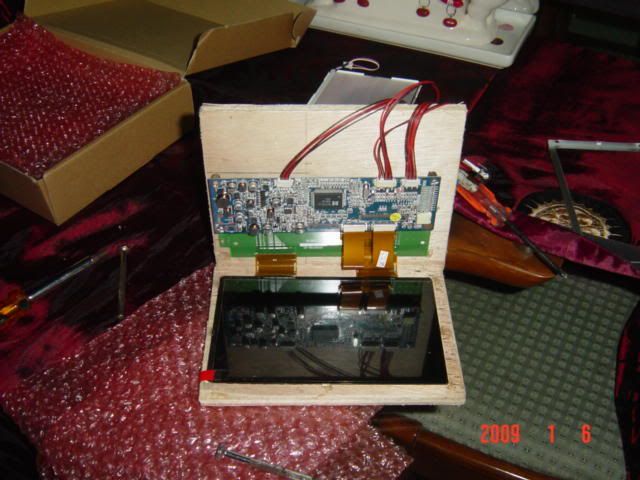
In the pics, you will see the finished frame and the lcd with still the backlight. No need for the backlighht in this project. You will need to remove the backlight and just make this as something useful say desktop lighting.
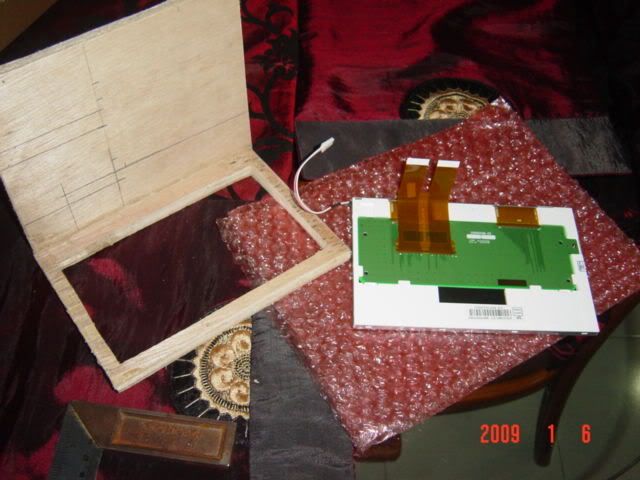
In the pics, you will see the lcd in the frame and the controller board installed in the backboard of the frame. The backboard is so much bigger so in your project just make this big enough to fit the controller baord.
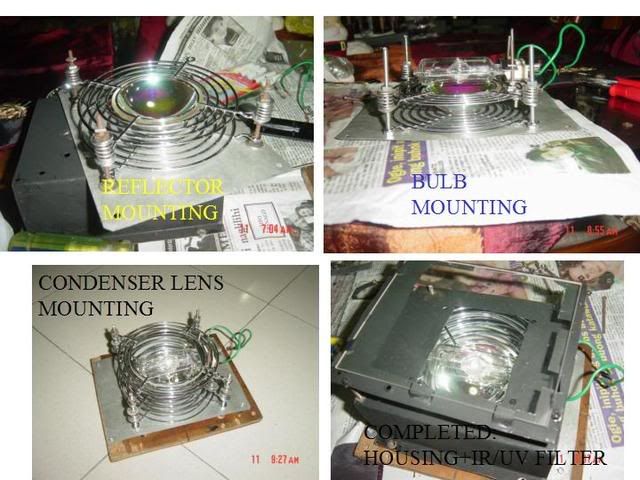
Step 3: Building the Light engine
Additional Materials needed:
Base plate: 1 pc
Fan Grills: size of the ordianry case fan
Assorted bolts and nuts.
4 springs
see pics.
a> mount the 4 -6inches long bolt in the base plate. The position of the bolt coincide with holes of the fan grills.
b> mount the reflector and put the fan grill on top. the fan grill was cut to accomodate the reflectro opening
c>put a spring on top of the 4 nuts to allow expansion of the reflector when heated
d>mount bulb base in the fan grill
e> add another fan grill to accomodate the opening of the condenser lens
f> mount the condenser lens
g> mount another fan grill to hold the condenser lens
h> put the housing or cover
e> install the IR/UV filter
All the light engine parts must be placed very close to each other except the IR/UV filter which is one inch from condenser lens.
Step 4 Buiding your box
The box size depends on your design. The focal length of projection lens and collimator fresenel dictates the length of the box. the width of the box is dictated by the width of your lcd panel
-
Verified Tsikot Member
- Join Date
- Sep 2008
- Posts
- 55
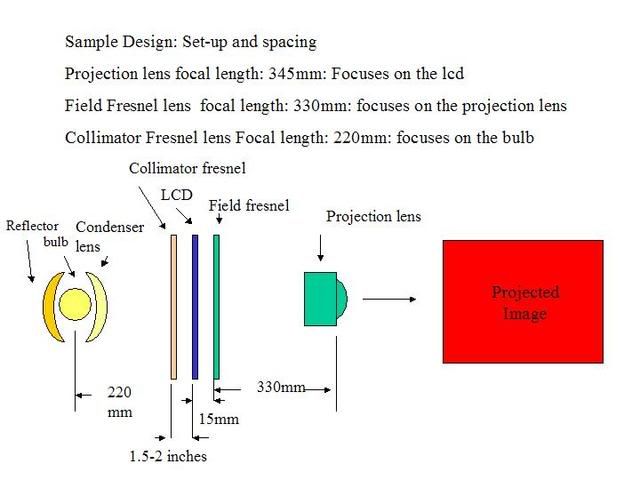
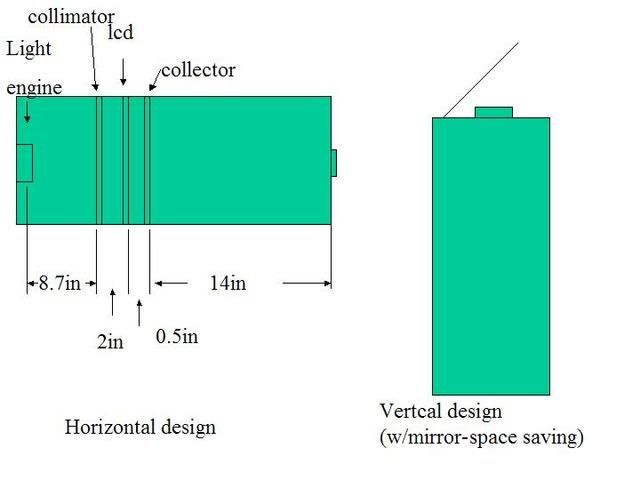
April 14th, 2009 10:01 PM #69Sample design:\
projection lens focal length: 345mm
Collimator fresnel: 220m
allowance
collimator fresnel to lcd: 2 inches for air circulation
Bulb to base plate: 2 inches
Most likely length of the box: 14in(345mm)+8.7(220mm)+2+2
;approx 27 inches
This is for the straight thru design. No mirror is used and the projector is in horizontal position. To save spave. a mirror is added on top and the projector will be in vertical position. This saves space.
Pictures of completed projector and all parts mounted. A power supply for fans and lcd using pc power supply is intalled near the projection lens.
Fans are installed at the sides one blowing between lcd and collimator fresenl and the other sucking out the hot air inside the box located down below.
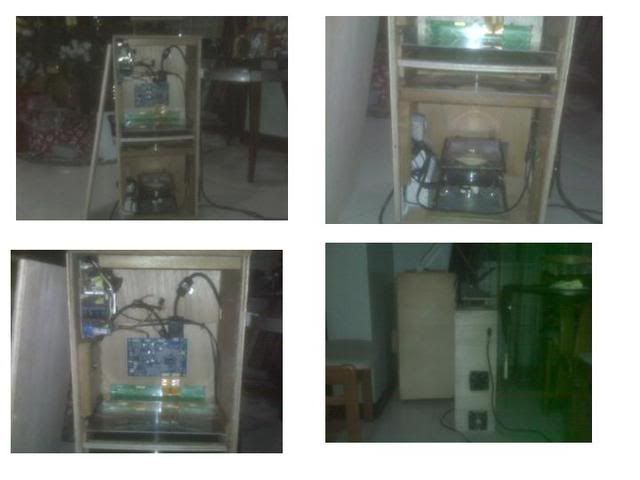
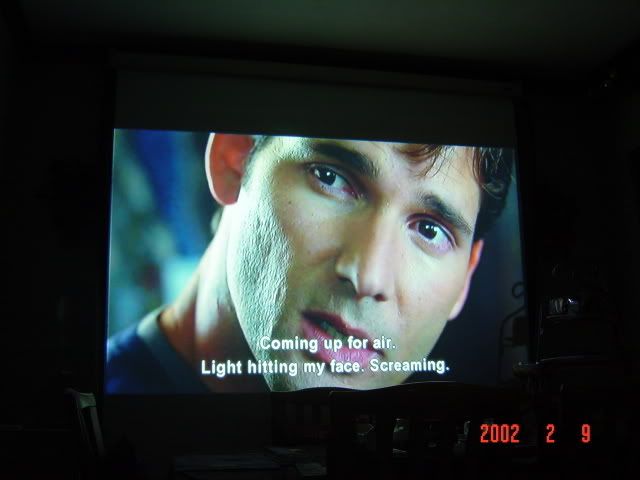
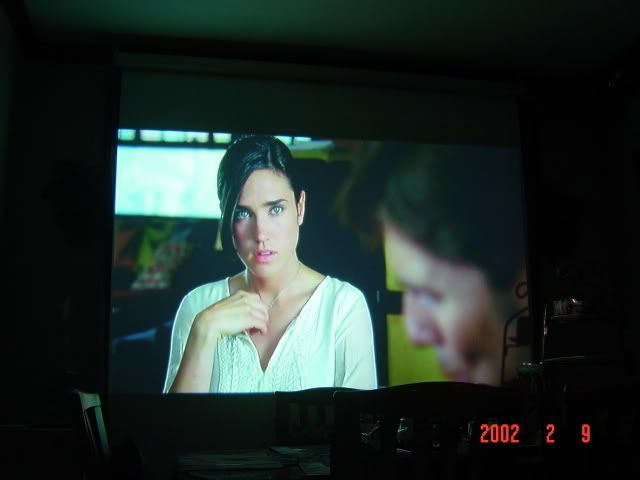
Image quality of this projector is very nice
10.2 inch lcd widescreen
800x480 resolution
response time: 25 ms
colors:262K
Sample image
links:http://www.diyaudio.com/forums/showt...5&pagenumber=1
http://s6.invisionfree.com/diyprojectorphils/
www.lumenlab.com
www.allinbox.com
-
BANNED BANNED BANNED
- Join Date
- Nov 2008
- Posts
- 416
April 16th, 2009 07:35 PM #70*hertzblaster1 - sir, ako, malapit na,,, malapit na akong makahanap ng electrician... will just text you soon.... thanks


 Reply With Quote


Hi, how about venom power terrahunter xt? any inputs if this is good tire also?
BFGoodrich KO2 AT or Bridgestone Dueller AT