
ah. san makakabili ng etching cream? balak ko kasi mag DIY. or if may ma-suggest ka na store na gumagawa heheOriginally Posted by zix888

The Largest Car Forum in the Philippines
- Forums
- Discussions
- Events
- Community
Results 2,761 to 2,780 of 5006
-

 Tsikoteer

- Join Date
- Feb 2008
- Posts
- 9,431
February 21st, 2012 12:20 PM #2761
-
Tsikot Member Rank 1
- Join Date
- Jul 2009
- Posts
- 4,090
February 21st, 2012 12:44 PM #2762Try ko ask yung ka officemate ko kung pwede na lang bumili sa kanya ng cream, kasi last time i asked him kung saan niya kinuhuka, ayaw niya idisclose, kasi sideline niya yun sa company namin. Madami na siya nagawan ng etching dun. Sakin naman kaya niya ako nabigyan, i did naman a diy sa oto niya, kaya nabigyan niya ko ng cream. Balitaan kita agad bro. Ask mo din prince777 alam ko niresearch na niya yang cream eh. Kung saan mas mura, dun tayo Originally Posted by crazy_boy
Eto parang mura na din "Etchall" type mo sa sulit. 60ml P200. marami ka na magagawa dunLast edited by zix888; February 21st, 2012 at 01:31 PM.
-
Tsikoteer
- Join Date
- Feb 2008
- Posts
- 9,431
February 21st, 2012 03:34 PM #2763zix, ano itsura ng stencil? malapit lang ako sa san lazaro hehe papagawa nalang ako dun ng stencil muna. Originally Posted by zix888
-
Tsikot Member Rank 1
- Join Date
- Jul 2009
- Posts
- 4,090
February 21st, 2012 04:21 PM #2764 Originally Posted by crazy_boy

Eto bro yung stencil, inverted bale siya, ang naka cut out is yung letters and nos. Yung cream ganyan yun nahingi ko
-
Tsikoteer
- Join Date
- Feb 2008
- Posts
- 9,431
February 21st, 2012 05:01 PM #2765ah gets. so sticker pala siya na inverted, yun na yung stencil mo hehe then pahid nalang ng cream? balak ko kasi lagyan lahat ng salamin ng FM ko Originally Posted by zix888
 btw, hows the baldwin filter doing?
-
Tsikot Member Rank 1
- Join Date
- Jul 2009
- Posts
- 4,090
February 21st, 2012 07:04 PM #2766Yup ganun nga. Pero i suggest palakihan mo yung pinaka area ng sticker, para hindi delikado malagyan yung parts ng salamin na hindi dapat malagyan ng cream. Kasi yung sakin nilagyan ko pa ng tape kasi naliliitan ako sa stencil baka pumatak sa gilid eh, magkaka-mark agad yan salamin. After applying the cream, let it stay for 15mins, tapos wash mo na ng water , when totally washed away all the excess cream, dun mo pa lang tanggalin yung sticker and tape. Dont worry, paint safe, plastic safe , safe sa lahat, reacts only to glasses. Originally Posted by crazy_boy
Baldwins are great, nag stock na nga ako 2 pcs filtersLast edited by zix888; February 21st, 2012 at 07:07 PM.
-
 {Keepin' it Stock}
- Join Date
- Feb 2007
- Posts
- 1,975
February 22nd, 2012 11:09 AM #2767Will have all my windows and side mirror etch by the end of march. Already ordered the armour etch cream and i have been reading about "in-place" etching since i dont want to remove the side mirrors..
-
Tsikot Member Rank 1
- Join Date
- Jul 2009
- Posts
- 4,090
February 22nd, 2012 11:12 AM #2768Ganito bro CB yung sinasabi ko, nilagyan ko pa ng extension na tape yung sticker para safe Originally Posted by zix888
-
{Keepin' it Stock}
- Join Date
- Feb 2007
- Posts
- 1,975
-
Tsikot Member Rank 1
- Join Date
- Jul 2009
- Posts
- 4,090
February 22nd, 2012 12:14 PM #2770Hindi naman mahirap tuklapin sir prince777. Okay din in-place yung side mirrors habang nilalagyan ng etching, yung ka-officemate ko na witness ko iba installation niya, lahat in-place Originally Posted by prince777
-
Tsikot Member Rank 1
- Join Date
- Jul 2009
- Posts
- 4,090
February 22nd, 2012 12:37 PM #2771Map version 2.0 update is stable so far. Question lang, looking at your monitor , navi on, there shows our position with an arrow, surrounded by small dots interconnected forming a circle, are those small dots slowly blinking? Anyone? Tia
-
Tsikoteer
- Join Date
- Feb 2008
- Posts
- 9,431
February 22nd, 2012 12:42 PM #2772zix, ganda nung side mirror turn lamp mo. Originally Posted by zix888
-
{Keepin' it Stock}
- Join Date
- Feb 2007
- Posts
- 1,975
February 22nd, 2012 02:09 PM #2773Thanks sir zix. Kung kaya ko lang yung LED indicators sa side mirror isabay ko na sana eh.. ;D Originally Posted by zix888
-
Tsikot Member Rank 1
- Join Date
- Jul 2009
- Posts
- 4,090
February 23rd, 2012 12:39 AM #2774Actually ang medyo mahirap lang is yung wiring. Sakin kasi isinama ko din sa oem wiring, dumaan din sa tubings, kaya medyo sumakit kamay ko after eh. Yung mounting ng arrow led turn lamp madali lang din, kelangan lang eh tools like heat gun(removing mirror from plastic backing), dremel(trim plastic backing to accommodate the arrow led), thinner(remove the primer from the back of the mirror itself), double tape. Originally Posted by prince777
-
Tsikot Member Rank 1
- Join Date
- Jul 2009
- Posts
- 4,090
-
Tsikoteer
- Join Date
- Feb 2008
- Posts
- 9,431
February 23rd, 2012 07:38 AM #2776haha! actually baka unahin ko turbo timer. yung nabili mo ba na pang monty fit kaya sa FM natin? Originally Posted by zix888
-
{Keepin' it Stock}
- Join Date
- Feb 2007
- Posts
- 1,975
February 23rd, 2012 09:48 AM #2777If it's not to much of a hassle sir zix, can you please send me a DIY installation instruction and items needed. Just when you got a chance. Originally Posted by zix888
Maraming salmat po. ;)
-
Tsikot Member Rank 1
- Join Date
- Jul 2009
- Posts
- 4,090
February 23rd, 2012 11:34 AM #2778-Arrow led Originally Posted by prince777
-double sided tape
-thinner(lacquer)
Tools
-heat gun
-dremel/soldering iron
-cutter
1. Remove the side mirror lens assembly from the housing/shell
2. Soften(heat gun) the edges of the plastic backing which is holding the lens.Â*
3. Carefully remove the lens
4. Check the area where you want your arrow led to be placed then trace it( both lens and plastic backing.Â*


5. Trim the plastic backing to accommodate the arrow led. If you have dremel, much better. I just used a soldering iron and finished using cutter.

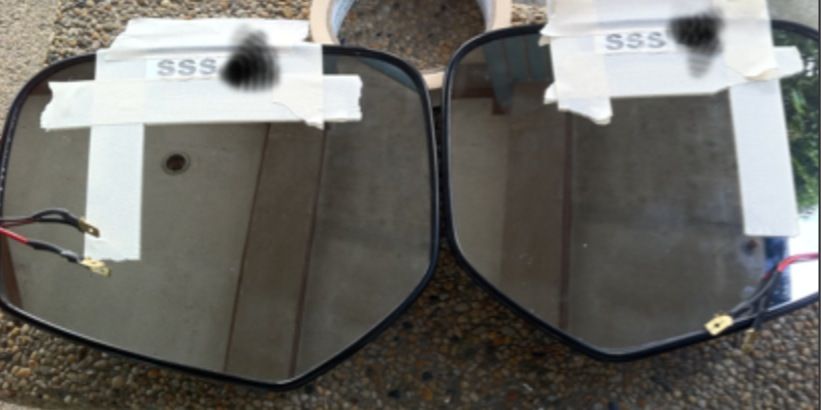
6. Use thinner thru cotton balls to remove the primer coating at the back of the lens. Gentle wiping then you will see that the paint will be removed. Use tape to shape it into an arrow so that the paint that will be removed will be nice, here it is after the primer coating was removed

7. Mount the arrow led, place the lens back to its housing( plastic backing).


8. Do the necessary wirings to make the led work
9. Re attach the mirror assembly to the shell and your done
-
{Keepin' it Stock}
- Join Date
- Feb 2007
- Posts
- 1,975
February 23rd, 2012 12:10 PM #2779Thanks a lot sir zix.. Bilis!
Will be looking for arrow led on ebay/amazon...
Thanks a lot.. :D
-
Verified Tsikot Member
- Join Date
- Jan 2012
- Posts
- 70
February 23rd, 2012 05:11 PM #2780Sir Zixx888 galing naman ng mga gawa mo sa monter mo lalo na ung sa steering control na may lights lupet....at pati sa arrow lights na signal sana eh magawan din ng akin ganyan style hehe. =) GLS - V 2011 model

 Reply With Quote